![]()
![]()
![]()


|
|
|
Free Download
|
ExcelBook Instructions Click here to download full sets of ExcelBook instruction Set Your Excel to Run Instruction Chapter 1 – Getting Started It runs on Excel 2007 or higher versions on PC (not for Mac). It works great with Excel 2007, 2010, and 2013. Download the free program copy from www.ExcelBook.Org: It contains 44 files. DO NOT open any files right after you download. Please unzip the folder and/or copy all the Excel files into your computer's local folder. Step 1, Unzip the folder: Extract all files into your local dedicated folder (do not open it directly from the zipped folder). It will not work from the zipped folder or from a cloud drive. For example: C:\Accounting\Program\XYZ Company\ Step 2, Open Program file in Excel (Excel 2007, 2010, or 2013): ABMenu.xlsm
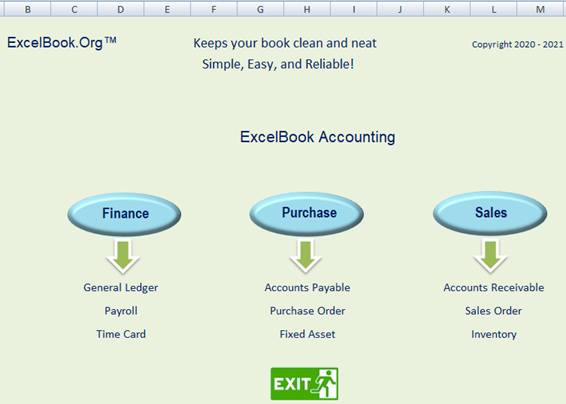
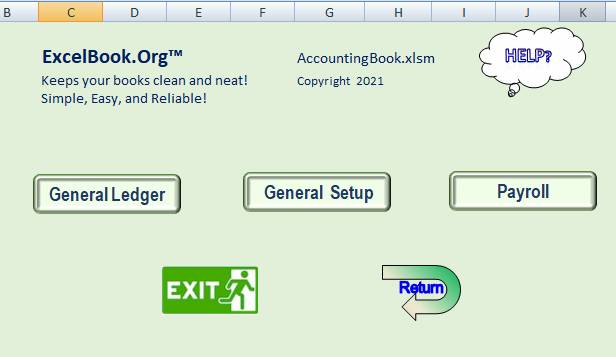
Figure A Use Excel 2007, 2010, or 2013 to open the Excel Accounting Book Menu file (ABMenu.xlsm) you will see the menu page as figure-A above. This is the main page of the program. There are four buttons: [Finance], [Purchase], [Sales], and [Exit] buttons and click on each of them will bring you to General Ledger, Payable, and Receivable module respectively. Let’s click the [Finance] button to start: Figure 1-1 This is the General Ledger’s main page. There are six buttons in the page: General Ledger, General Setup, Payroll, Help, Return, and Exit. Before we go any further, it is necessary to discuss the program structure and its hierarchy in order to understand how the program is composed and how to use it. Please continue read chapter 2. Chapter 2 – Program Overview
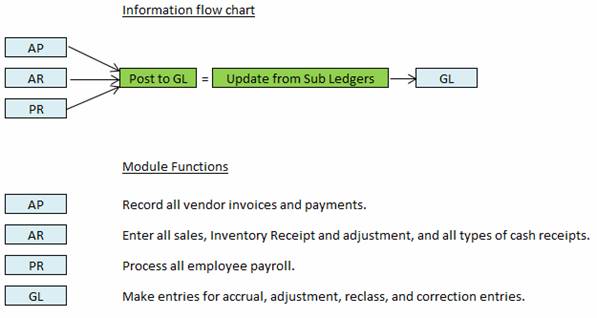
I. Program Structure and Hierarchy There are four major modules in this program: General Ledger (GL), Accounts Payable (AP), Accounts Receivable (AR), and Payroll (PR), while Sales Order and Inventory reside within Accounts Receivable, and Purchase Order resides within Accounts Payable while Fixed Asset is an independent module that can be used as subsidiary ledger within ExcelBook.
AP, AR, and PR periodically distribute (through users’ posting or releasing) their entries to GL, and then GL updates the information from the subsidiaries’ distribution (Integration). All the files (either programming files or data files) are kept in the same directory folder (for example: C:\document\program\Accounting\ABCompany\). However, each module can be operated independently and/or simultaneously in different computers or different locations. Subsidiaries (AR, AP, or PR) can run in separated computers without any linkage, network, WIFI, or Bluetooth. If you install AR, AP, or PR in different computers, you may simply copy the distribution files from the subsidiaries to the folder where your GL module is located, and the GL can import those files via clicking the [Integration] button. To do the distribution, simply enter a date range in AP, AR, or PR (for example, in AP from 1/1/2022 to 1/31/2022) and click the [release to GL] button (detailed instruction shows in each module). The program will create a distribution file (APPD20220101-20220131.xlsx) when you post the batch. This data file will be saved in the same directory folder. Once a data file from AP, AR, or PR is available in the folder, GL can update/post the entries from the subsidiaries via the Integration button (see detailed instruction in later chapter).
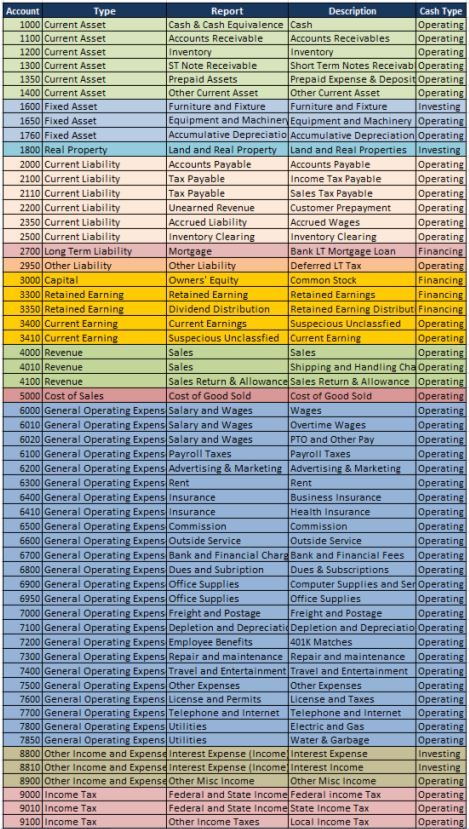
II. General Information and General Ledger: Traditionally, there are two kinds of GL accounts: Balance Sheet Accounts and Income Statement Accounts. All accounts are categorized as Asset, Liability, Capital, Sale, Cost, and Expense (see Table 2-1 below). Each of these accounts contains its own sub-category showing on the right column (Account Type Table 2-1): Asset: Current Asset, Long-Term Asset, Fixed Asset, Real Property, and Other Asset Liability: Current Liability, Long-Term Liability, and Other Liability Capital: Capital, Retained Earnings, and Current Earnings Sales: Revenue Cost: Cost of Sales Expense: General Operating Expense Other: Other Expense (Income) Tax: Income Tax Adjustment: Adjustment Table 2-1 ExcelBook All GL Account Types:
Table 2-1 III. General Ledger Account and Reporting Structure: The program is set the account type in this order for reporting purposes. You are not able to change the order or rename them. Same as the Account Type on the left column, these account types are also static and you may not change them. However, you may add, edit, or delete a GL account and rename their reporting titles. Under each Account Type, it may contain several reporting titles. For instance, [Current Asset] - under this account type there are up to six (6) reporting titles for Current Asset (Sample: Cash & Cash Equivalence, Accounts Receivable, Inventory, Short-Term Notes, Prepaid Asset, and Other Current Assets. See Table 2-2 below). You can rename these titles as needed. Under each reporting title, it can contain several GL accounts. For example, you may have two GL accounts for the reporting title of “Utility Expense: Electricity and Water”; or you may have Saving, Checking, and Petty Cash under the reporting title of “Cash & Cash Equivalence”. Table 2-2 below shows the relationships between Account Types, Reporting Titles, and GL accounts. Table 2-2: Balance Sheet Account Type and Reporting Titles
Table 2-3: Income and Expense Account Type and Reporting Titles
Table 2-4: Reporting Titles and GL Accounts: Sample 1
Table 2-5: Reporting Titles and GL Accounts: Sample 2
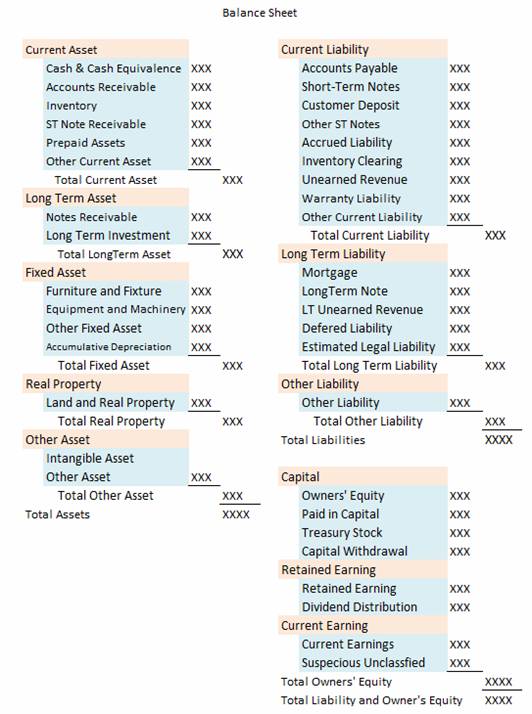
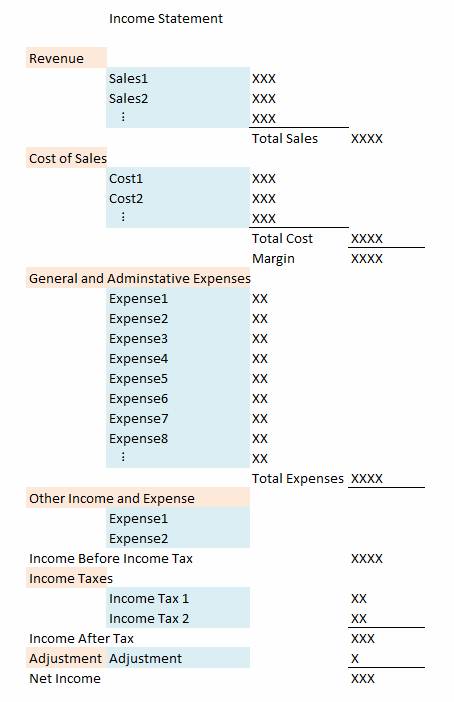
Tables 2-4 and 2-5 show samples that you can Add, Edit, or Delete a GL Account within each reporting group I. Reporting Format: The following two charts show the reporting format of Balance Sheet and Income Statement: The ones highlighted in pink are account types, and the ones highlighted in light blue are reporting titles. Account types are not changeable and the reporting titles are editable can be modified.
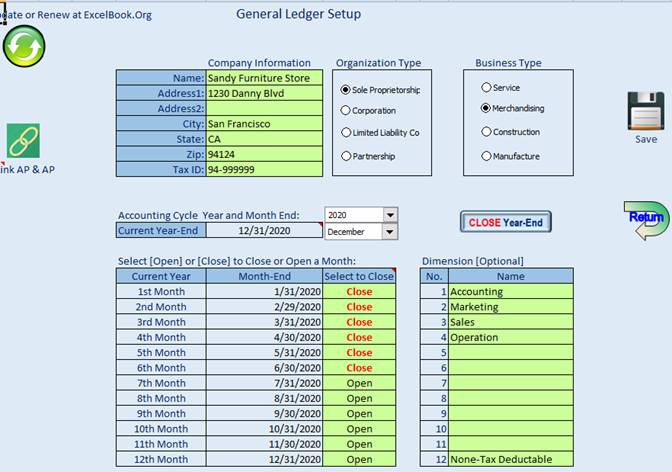
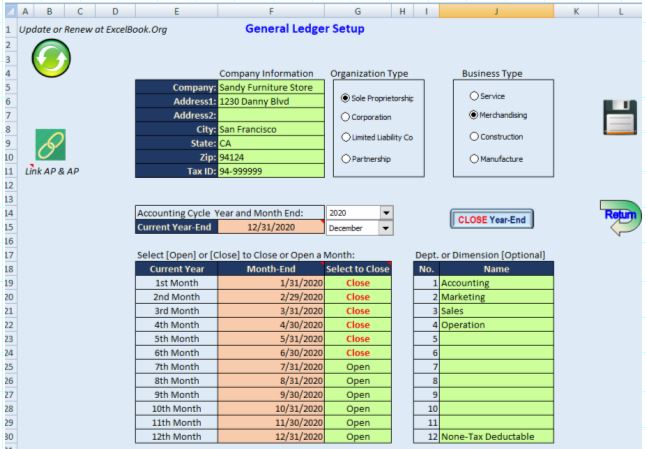
Chapter 3 – General Ledger I. General Setup Click on the [General Setup] Button from Figure 1-1 above. The Setup Page is shown as Figure 3-1 below. A) Enter Company information in the green area. Figure 3-1
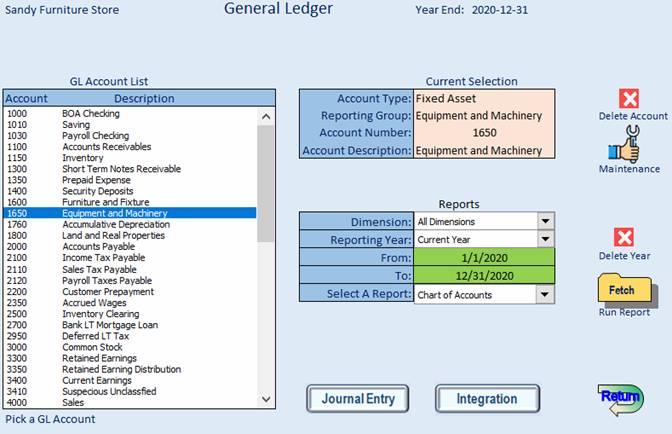
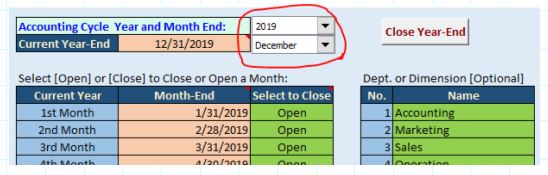
B) Select your organization type and business type. C) Select/enter accounting cycle (select Year and Month). Make sure to select all months as [Open]. D) Enter company dimensions if any (optional). Dimensions can be departments or operation sections. E) Click the [Save] icon, and Click the [Return] icon to return to the previous menu (Figure 2-1). F) Link AP and AR modules. AP or AR modules with their data files in the same folder as the GL files are automatically linked together. However, if you have more than one company using this G) program, you must store the program in different locations or different folders since you may not be able to change the program name or names of the data files. To prevent program files from crossing or being misplaced, you can click the link II. Setup General Ledger Accounts From Figure 1-1, click on the [General Ledger] button. Figure 3-2 should be shown. Figure 3-2
Before making changes (add, edit, or delete) to GL accounts, you may need to design your General Ledger accounts if you are starting a new company. To do so, please refer to the beginning section [General Ledger Overview] and lay out your General Ledger accounts and financial reporting structure. However, there is a default setting with the program, and you can modify it to meet your needs. If you are transferring or converting your Accounting System to this ExcelBook Accounting Program, the first thing you may need to do is to compare the Chart of Accounts between yours and the default one from ExcelBook (you can print the ExcelBook default Chart of Accounts from the Report Section). And then modify the accounts or make changes wherever necessary. Please also read the “System Conversion Instruction” in the Appendix. Default General Ledger Accounts Asset: There are five (5) Asset types in Asset GL Accounts: Current Asset, Long-Term Asset, Fixed Asset, Real Property, and Other Asset. The program already pre-sets some accounts for Current Asset, Fixed Asset, and Real Property Accounts. You can modify, delete, or add some accounts if needed. Liability: There are three (3) Liability types in Liability GL Accounts: Current Liability, Long-Term Liability, and Other Liability. The program has already pre-set some accounts for each type of liabilities. You can modify, delete, or add some accounts in each reporting title. Capital: There are three (3) Capital types in Equity GL Accounts: Capital, Retained Earnings, and Current Earnings. You can rename the reporting titles for the Capital accounts. But, you are not allowed to change or delete the Retained Earning Accounts. Revenue and Cost of Sales Accounts: There are up to five (5) reporting titles for Revenue (Sales) and five (5) reporting titles for Cost of Sales Accounts: Each Revenue reporting title can also contain five (5) individual GL Accounts. The default company setup has two (2) sales reporting titles: Sales, and Sales Return and Allowance. There are two (2) GL accounts under the [Sales] reporting title: Sales (4000) and Shipping and Handling Charges (4010). Operation Expense Accounts: There are up to twenty-eight (28) reporting titles for Operating Expenses Accounts: The following 19 reporting titles are already named in the default setting:
Each of these reporting titles can contain up to 3 to 7 GL accounts. You can add more reporting titles and/or add/delete/edit GL accounts. Other Income and Expenses: This section is after the Operating Expense but before the Income Tax Section: Generally, interest income and interest expenses are reported in this section. Income Tax Expenses: The last section in the Income Statement: The existing default accounts including Federal Income Tax and State Income Tax. You can modify them or add other local taxes, if any. Adjustment: Adjustment account for Prior Accounting Error or Other Items: You can add an adjustment account if needed, as this account should be reported as net of tax if it is from a prior adjustment or accounting errors. Net changes from Discontinued Operation sections or Extraordinary Transactions or Cumulative effects can also be reported here. Existing default accounts show in Table 3-1 below: Account Number – Restricted for a four (4) numeric number, such as 1000, 1011, 2111, 6542, etc. Type – Account Type, they are set by the program and not changeable. You must select one of the types for setting up an Account. Reporting Group – Reporting title or heading, you may change the description of the reporting titles, but you may not delete them. If you don’t have any GL account under a reporting title, the program will automatically purge it when generating reports. Description – Account descriptions, please keep them short and brief. Cash Type – Net changes of the Account reports in Statement of Cash Flow. Table 3-1
A) Delete a General Ledger Account
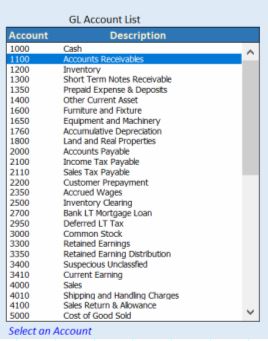
Step 1, Click on the Account you want to delete from the GL Account List window Figure 3-2
Step 2, Click on the icon [X] . Delete this Account (you are not able to delete a GL account if it has activities). Step 3, click “Yes” to confirm or “No” to cancel.
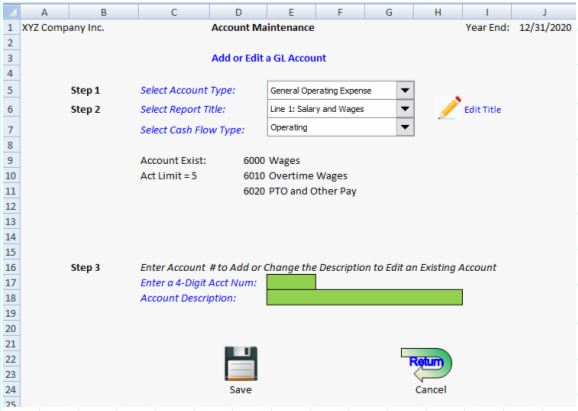
B) Add a General Ledger Account From Figure 3-2, Click on the Maintenance Icon
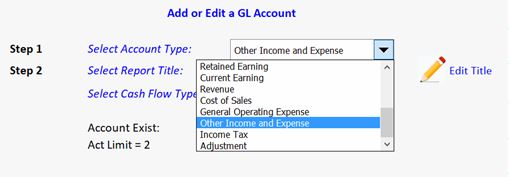
Follow the instructions on the screen: Step 1, Select Account Type Select one from the drop-down menu:
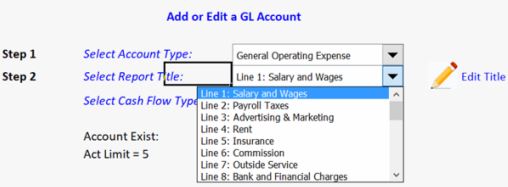
Step 2, Select Report Title Each Account Type has one or more reporting titles. Select one of them.
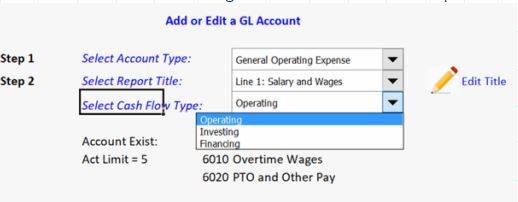
Then, select a Cash Flow Type from the second drop-down menu beneath the Report Title. This is for the purpose of reporting cash activities. The net changes of the account will be reported in Cash Flow Statement.
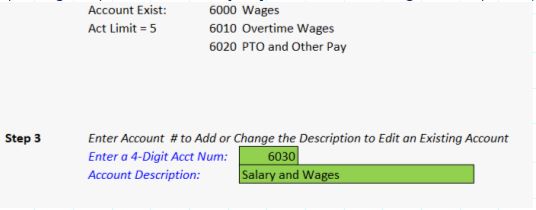
Step 3, Enter Account Number and Description
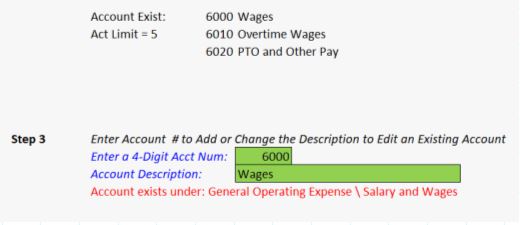
Click the [Save] icon C) Edit a General Ledger Account In Step 3 above, enter the Account Number you want to edit in cell [E17]. If the Account Number you entered is unique, then a new account will be added when you click the [Save] icon. However, if you enter an existing Account Number, it will display in red telling you the Account already exists in the system. Make changes to the description. Click the [Save] icon, and the new description will be saved for the Account.
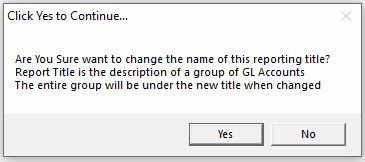
If you know the Account Number, you can skip Steps 1 and 2. Just enter the Account Number and you can change the description. Click [Save] to update the Account information. Please note that you are not able to change the Account Number or reclassify the reporting position of an existing Account. D) Edit a Reporting Title The report title can be changed by clicking on the [Edit] icon
Click “Yes” to Confirm or “No” to quit. Click Yes:
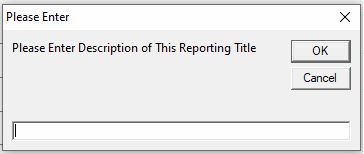
Enter your new Report Title in the dialogue box and click OK to complete the change. Please note that once the reporting title is changed, all the existing GL accounts under the old reporting title will change to this new title. III. Financial Statements and Related Reports Major financial statements are included in the default pre-setting. Income Statement, Balance Sheet, and Statement of Cash Flow are set at the standard format as shown in the Previous Chapter [General Ledger Overview] or page 9 in the instruction booklet. All financial reports are exported in Excel format. To generate a financial report, Click the [General Ledger] button from the main page:
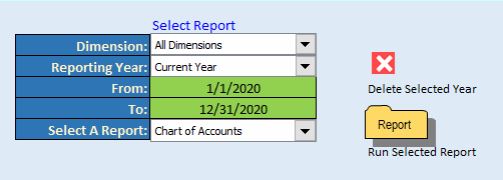
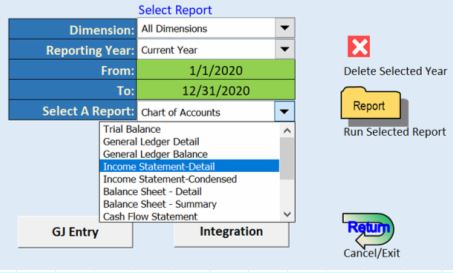
A) Trial Balance, Income Statements, Balance Sheets, Statements of Cash Flow, or General Entry Reports: Step 1, Select a Reporting Year from the drop-down menu. The default year is the current year. After you close a year, it will become a history year. If you want to run a report from a history year, you have to select that year to run a history report. Step 2, Enter a date range in the green cells. It can be any range within the reporting year. Step 3, Select a Report from the drop-down menu.
Step 4, Click on the Report icon B) General Ledger Reports To run a GL account in detail or summary, click on the GL Account to select, and complete Steps 1 through 4 as section A above.
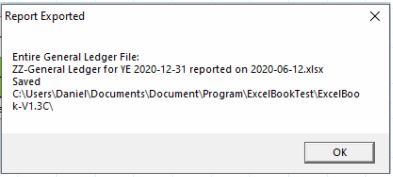
In Step 1 above, if you select [Export All General Ledgers], a file named: ZZ-General Ledger for YE YYYY-MM-DD reported on YYYY-MM-DD.xlsx will be saved in the same directory as your program located. You can use this file or open it to view all the GL accounts.
Please note that all files named with a “Z-” or “ZZ-” prefix are for end-users, and you may cut and copy or move them to other locations or delete them if you don’t need it (file and data management will be discussed in the later chapter). C) “Reporting Title” Reports Financial Statements summarize GL Accounts and are displayed as “Reporting Titles”; to drill down the details, you need to run this “reporting title” report. To do so, simply repeat Steps 1 through 4 in Section A above. But, to select “BS Report Title Detail” or “IC Report Title Detail” representing “Balance Sheet Reporting Titles” or “Income Statement Reporting Titles” respectively. IV. Journal Entry Click on the [Journal Entry] button from page 16 showing in Figure 3-2 above. The General Journal Entry page shows as follows:
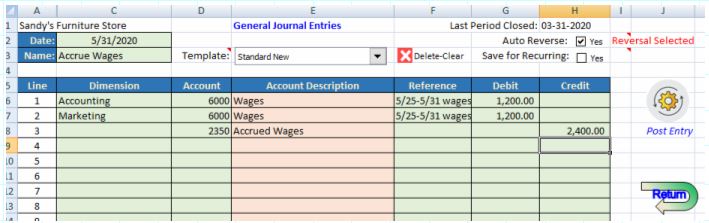
A) General Entry Enter the information in the green area and Click on the [Post] icon
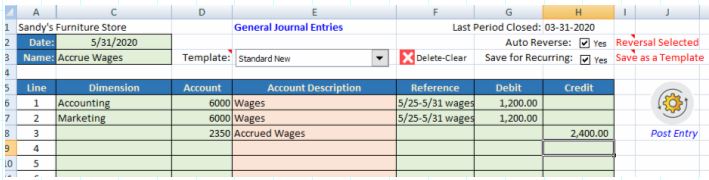
B) Reversal Entry The program will automatically post a reversal entry on the first day of next month if the [Auto Reverse] check box is checked (see the screenshot in Section A above). C) Save and/or Remove a saved Recurring Entry Template You can save an entry as a template if the [Save for Recurring] check-box is checked.
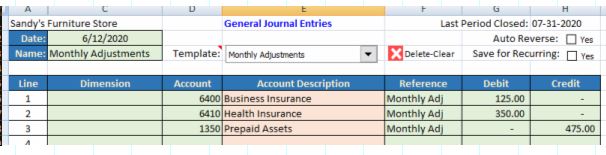
After you click the [Post] D) Clear/Reset Entry or Delete a saved Template
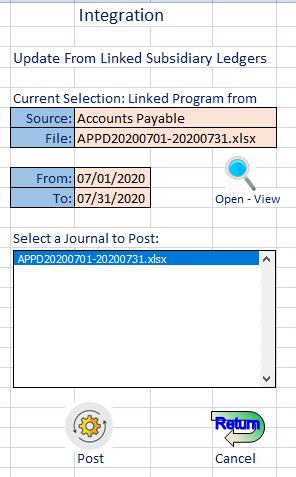
If the Template drop-down box shows [Standard New], click the Delete-Clear V. Integration with Subsidiary Ledgers Click on the [Integration] button from page 16 showing in Figure 3-2 above. The page shows as follows:
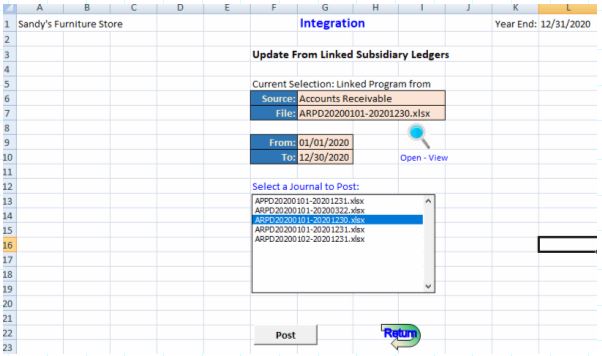
A) Post Entries from Subsidiaries The list of Excel files in the selection box is the information released from AP, AR, or PR naming:
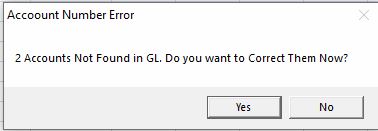
APPDYYYYMMDD-YYYYMMDD.xlsx -- from the first two letters AP (Account Payable) ARPDYYYYMMDD-YYYYMMDD.xlsx -- from the first two letters AR (Account Receivable) PRPSYYYYMMDD-YYYYMMDD.xlsx -- from the first two letters PR (Payroll) These files are created by the system when you post/release AP, AR, or PR information to GL. The second two letters are either “PD” or “PS” standards for “Post in Detail” or “Post in Summary” (Payroll module posts in summary). For example, APPD20200101-20200131.xlsx is the Accounts Payable file, posted in Detail from January 1, 2020 thru January 31, 2020. For AP and AR if you post in summary, the GL Account dimensions cannot be identified. So, in order to have a dimensional report for GL accounts, you should post/release information in detail format (to be discussed in AR/AP modules). Select a file from the window in the page that lists all available entries from subsidiary ledgers. You can click the [Post] button to post the entry. If you are unsure and want to view the actual entry before posting, click on the magnifying glass B) Account Error Handling For whatever reasons, if an Account Number from a subsidiary ledger posting is not matching the Accounts in General Ledger, the posting is not allowed.
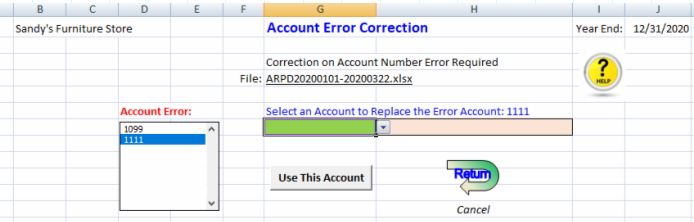
Click [Yes] to do the correction or click [No] to abort the posting. After you click [Yes], the correction page shows the following:
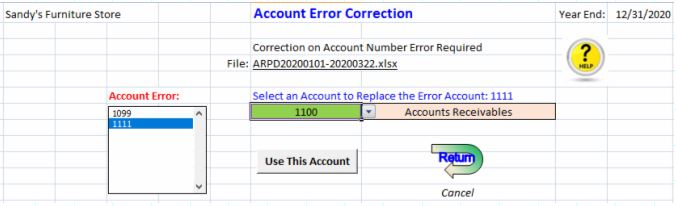
Highlight the Error Account from the [Account Error window], then select or enter the correct Account Number in the green cell [G7], and finally click [Use This Account] to correct the Account error.
C) Unbalancing Correction In addition to the Account Number error, if anything is unbalanced in Debit or Credit, entries will not be posted. The following message will display: If this is the case, click the magnifying glass VI. Month End and Year End Closing Click the [General Setup] button from the main page (Figure 1-1 above) to get into the Setup page:
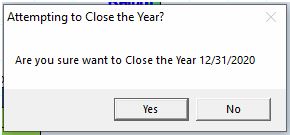
(A) Close a month: From the General Setup page above (Figure 3-1), select or enter “Close” in the [Select to Close] column for a month. Closing a month must be in chronological order; you cannot close a month when the prior month is still open. Note: Closing a month is optional. It is not necessary to close a month before working on next month’s transactions. Closing a month in Excel Accounting Book means to lock the period when the month is completed. You can reopen a month whenever it is needed. (B) Close a Year: It is different from closing a month. Closing a year is necessary when a year is completed. You can continue working on transactions using the new accounting cycle year without closing the old year if adjustment entries are not completed. However, you must close the old year before the new Accounting year reaches its year end. Click the
Click “Yes” to confirm the closing process.
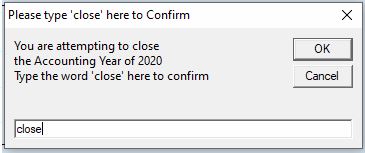
Type the actual word “close” in the dialogue box above. Click “OK” to complete the Year End Closing. Warning 1: Before closing the year, you should complete all of your posting entries from subsidiary ledgers and general adjustment entries. Once the year is closed, it is NOT reversible. In another words, you are not able to reopen a year if it is closed. Please make sure you make a backup copy before closing. Warning 2: This [Close Year-End] button is also used to clear/erase sample data (to make a blank copy of the program. Instead of typing the word “close” in the dialogue box, if you type a special clearing code into this box, the program will erase all data in the program. You may need to clear the sample data or the practice sand box information once in a lifetime. You can order a clearing code from ExcelBook.Org, if needed.
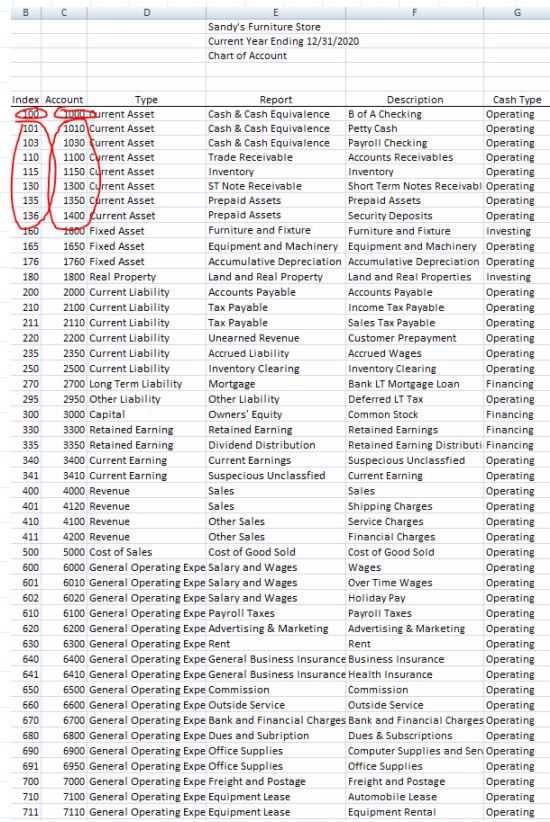
Appendix I. – System Conversion Converting an Accounting system to a new one could be a big or sometimes complicated job. However, with the methodologies of ExcelBook, you can make the transition simple, effective, and accurate. In case you need help, ExcelBook is happy to assist you in converting or in setting up the system for you. Advice and Recommendations before conversion: (A) Understand the program – learn the program by reading the instructions or watching the tutorial videos. (B) Make a duplicated copy of the program. Clear all sample data to make a blank copy of the program (see Appendix III - how to clear the sample data). After you learn and become familiar with the program, you may start new or convert your system over. The conversion process contains three (3) stages: (1) Preparation (2) Planning (3) Conversion Stage 1, Preparation The preparation stage is to modify the ExcelBook default general ledger accounts to your own general ledger accounts, and to upload/enter all customers, vendors, and inventory item information into the new ExcelBook system. Modify the default GL accounts: A) Print your existing Chart of Accounts or get a list of your existing Accounts with detailed account information. For example:
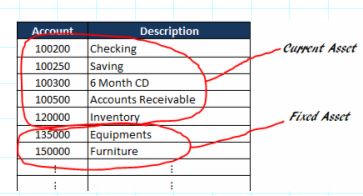
B) Organize and classify your account type Classify all your general ledger accounts into the following types, if applicable: Current Asset Long-Term Asset Fixed Asset Real Property Other Asset Current Liability Long-Term Liability Other Liability Capital Retained Earnings Current Earning Revenue/Sales Cost of Sales General Operating Expenses Other Income and Expense Income Tax Adjustment The idea of doing this is to match your accounts with the default accounts in ExcelBook so that you can modify the existing accounts in ExcelBook without “Deleting and Recreating” all the accounts in ExcelBook.
After you have classified all your general ledger accounts, you are ready to input all of them into the ExcelBook system. C) Print ExcelBook’s default Chart of Account
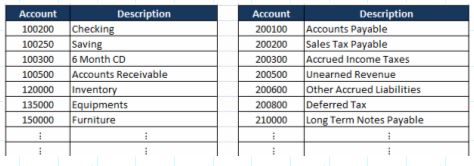
The default Chart of Account from ExcelBook contains six (6) columns: Index, Account Number, Account Type, Reporting Group, Account Description, and Cash Type. And, traditionally, asset account numbers start with a “1” (such as 1000), liability accounts start with “2”, equity accounts start with “3”, sales accounts start with “4”, cost of goods sold accounts start with “5”, and expense accounts start with “6”, “7”, or “8”, etc. In ExcelBook’s default design, the Index Numbers and the Account Numbers are similar. The Index Number is a 3-digit number that is used by the system; and the Account Number is a 4-digit number that should be created by the end user. Because the system index is always in numeric order, ExcelBook created the 4-digit Account Numbers similar to the system index for the purpose of making sure the Account Numbers are in an Accounting order. Of course, you don’t have to follow this un-documented rule. You can create your own or do not even need an account number. However, in order to keep your book clear and organized, ExcelBook strongly recommends that you should follow the pattern. D) Match your existing accounts with the default ones in ExcelBook.
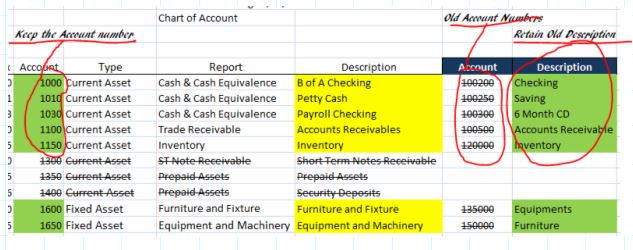
The left side is the Chart of Account from ExcelBook and the right side is your existing accounts. After you match them one by one, you will retain the ExcelBook account numbers, but change the description (highlighted in yellow) to your account descriptions (highlighted in green). Delete the accounts that you don’t need. Add accounts if necessary. When adding an Account, you may want to make sure the account numbers are in sequence. For example, if you want to add a 4th cash account, select “Currrent Asset”, then “Cash & Cash Equivalence”, then perhaps enter 1040 (any number after 1030). You don’t want to enter a number that is beyond the reporting group or the existing current asset number, such as 1200. You can see from the chart, 1200 is after Inventory. “Cash & Cash Equivalence” accounts should be before 1100 Accounts Receivable. After you modified all the Accounts in ExcelBook to be identical with the Accounts from your older system, you are now ready for Stage 2 and to transfer your ledger trial balances to ExcelBook system. Stage 2, Planning Before transferring data to your new ExcelBook system, you should plan a cutoff day and make a decision if history data will be transferred. The cutoff date is the date that you want to transfer the data over and start using your new ExcelBook system the next day. In order to be clear, follow this example: Today is October 22, and you selected October 31 as the cutoff date. Here is the plan: A) Between October 22 and October 31, you will continue to use your old system as usual. B) On October 31 (by the end of the day), print an AP and AR aging detailed reports from your old system. Print the open AP and AR distribution journals [only the open items for AP (purchase) invoice journal entries and open AR (sales) invoice journal entries]. C) After October 31, if the month of October has not been closed (you may need to work on GL adjustment entries until sometime later), you will continue to use your old system on your GL entries until the month of October is closed. But do not enter any AP or AR transactions (AP or AR invoice, AR cash receipts, etc.) in your old system after October 31st. D) Regardless if October is closed or not, beginning November 1st you will be using the new system for all subsidiaries (AP, AR, and PR) entries: a) AP: enter all AP New invoices regardless of the invoice dates in new system (AP New invoices - meaning the invoices that have not been recorded or entered in your old system). b) AR: enter all new sales invoices in the system (AR new sales invoices - meaning all invoices that have not been entered in your old system). c) In the meantime, enter all AP and AR aging open invoices from the aging reports (printed in Section B above) into the new ExcelBook system. There is no need to enter them all at once (as it may take time to enter them), just as long as you can complete the entries by the end of November 30th (or by the due dates for AP to pay if earlier than November 30th). d) AP payments (such as cutting checks) and AR cash receipts will be recorded in the new ExcelBook system if the payment or cash receipt transaction dates are on or after November 1st, regardless of the original AP or AR invoice dates. E) After October is closed, print out a trial balance as of October 31 and transfer the balance to the new ExcelBook system (either by manual general journal method or import integration method —discussed in the technical menu). F) Reconcile and reverse AP and AR aging to complete the conversion. Stage 3, Conversion Let’s continue to use the example in Stage 2 for the conversion process: A) Print GL trial balances from the last year end through the last month end. In this case, you will need your trial balance as of 12/31/2019, 1/31/2020, 2/29/2020, 3/31/2020….Through 9/30/2020. Print AP and AR aging as of 10/31/2020 and print the open AP and AR distribution journals [only the open items for AP (purchase) invoice journal entries and open AR (sales) invoice journal entries]. B) Setup your Accounting year end as: December 31, 2019.
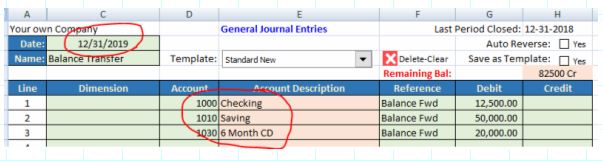
C) Transfer the trial balance as of 12/31/2019 via general journal entry method or integration method · Enter the trial balance in the general journal entry.
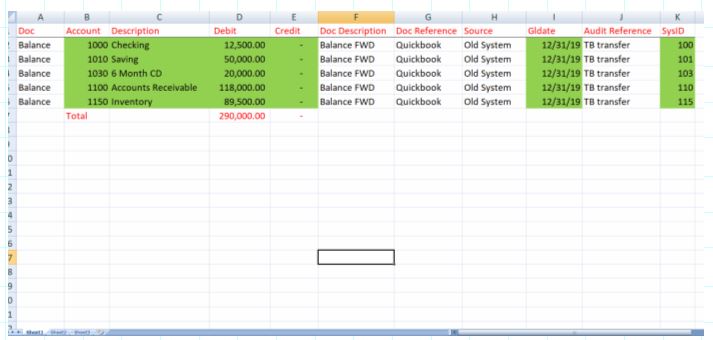
There are 116 lines for entering the trial balance as the journal entry. If you have more than 116 accounts with balances, you can use the integration method to post the trial balance. · To use the integration method, download a template from ExcelBook.Org or create a new Excel document file exactly as shown below:
Integration File Requirements: a) The Excel file contains three (3) tabs (by default): Sheet1, Sheet2, and Sheet3. b) Data to be entered in [Sheet1] shown above. c) The heading in row 1(Red) must be exactly as above. d) The end of column “B” must contain the word “Total”. e) The end of column “D” and “E” must contain the total number in equal value. f) In the Debit and Credit columns, “D” and “E” must be in value in all cells (cannot be blank, if it is zero, enter “0” instead of leaving it blank). No cell should be left blank for all columns A thru K. g) Fill in all green areas as shown above. h) Save the file as: GLPS20191231-20191231.xlsx in your program folder. File name format: GLPSyyyymmdd-yyyymmdd.xlsx Then, go through the integration from General Ledger module:
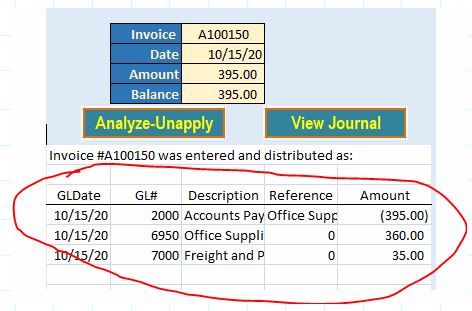
D) Since you are now in October 2020, you need to close the year ending 12/31/2019. Once you close the year, you will start a new year beginning 1/1/2020. If you do not wish to transfer the history data of 2019, you will select December 31, 2020 as your Accounting cycle in Section “B” above. E) Get the net changes or calculate the net changes from each month’s ending trial balance for the months of January and February thru September 2020. Repeat one of the methods in section “C” above to transfer the trial balance of each month. F) Reconcile your GL to AP and AR. Because the open AP and AR aging invoices are entered into the new system, which they are already included in the general ledger from the old system, after posting the AR and AP, related account balances will be duplicated. Therefore, you must reverse those AP/AR invoice entries before the GL balances can be reconciled. To do so, get the distribution (AP or AR journal) for invoices (outstanding invoices in the old system) entered into the new system (they should be the same as the journal reports in Section A above). The journals can be in either detail or summary. They can be very simple depending on how many AP or AR invoices open as of 10/31/2020. For example: When you process an AP invoice, you can see the journal entry as: 6950 Office Supply 360.00 7000 Shipping 35.00 2000 Accounts Payable 395.00 (from your distribution report on AP aging open invoices)
After you enter this invoice again in the new system, you will need to reverse them in GL to offset the duplication: 2000 Accounts Payable 395.00 6950 Office Supply 360.00 7000 Shipping 35.00 (to the reverse the new posting) Do the same for all open AR (sales) invoices as of October 31st. However, the AR sales invoices are double entries: 1100 Accounts Receivable 1000.00 4000 Sales 910.00 2110 Sales Tax Payable 90.00 5000 Cost of Goods Sold 420.00 1150 Inventory 420.00 If however you need help with this, please contact ExcelBook.Org and we will help you either setup this system for a startup new company or help you convert your current bookkeeping system to ExcelBook system. Appendix II. – File Management It is very important to understand how the program works and what the files are. You will be able to use the data files, organize them, and manage your program files and folders. There are three (3) types of files in ExcelBook folder: Programming files, Program data files, and User data files. (1) Programming Files:
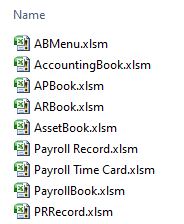
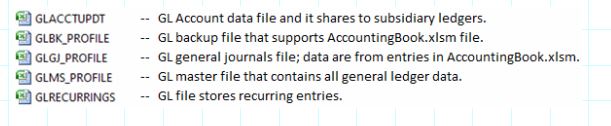
AccountingBook.xlsm is the main file, and all general ledger programming activities are executed by this file. This file also manages and controls other subsidiary ledger files. You can open them directly from the folder. These four (4) files manage and use all other program data files. You may not change the names or save them as different formats. APBook.xlsm manages Accounts Payable (AP). All AP data files are controlled and used by this file. ARBook.xlsm manages Accounts Receivable (AR). All AR data files are controlled and used by this file. PayrollBook.xlsm manages Payroll (PR). All AR data files are controlled and used by this file. AssetBook.xlsm is an independent module that manages and calculates fixed asset depreciations. All program files must be saved in the same program folder. You may not change the names of them. You may make copies and paste them to other folders with program data. (2) Program Data Files: A) General Ledger files:
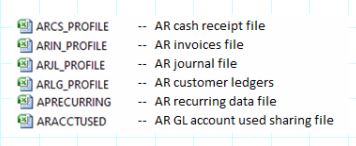
B) Accounts Payable files:
C) Accounts Receivable files:
D) Inventory Files:
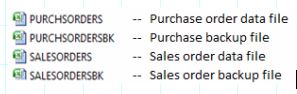
E) Purchase Order and Sales Order Files:
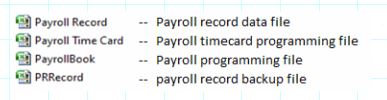
F) Payroll Files:
G) Coding files:
These are the coding files that support related programming files. All program files, program supporting files, and data files must be saved in the same folder as the programming files. You may not change the names of them. You may copy and paste them to other folders with the programming files. Most of the data files are password protected and files can only be opened by the program or used by authorized tech agents. Do not attempt to make changes to the data files or the program will malfunction. If you see data files are open, please close them without saving them or the data may be damaged, and you should store a backup copy for your program. All program data files ending with a suffix of “_PROFILE” are data with the current year information. Once the current Accounting year is closed, the program will create history files and rename them with a suffix as “_YYYYMMDDYE”. For example: ARIN_PROFILE => Current Year data ARIN_20201231YE => History file for year ending December 31, 2020 You may not change names of history files. If you do not wish to retain the history information, you may delete the history year through the program, and the program will remove these files for you. (3) User Data Files: Similar to the programming data files, the program will create more and more files as the program is being used. You may delete any unwanted year history files through the program; the program will delete them when you click the delete button. However, some files are created by the program for end user use only. The data files for end users are with a pre-fix “Z-” or “ZZ-”. They are not password protected, and you may use them, move, copy, or delete them. When you closed a year-end in General Ledger, all these “Z-“ or “ZZ-“ user files will be moved to a yearly data folder by the system. For example:
“Z-” file was being used by the program, but won’t be used by the program any more. You can open then, view them, or use them. Z-PRPS20200416-20200430-1332P, stands for Payroll (PR), Posting in Summary (PS), data from April 16, 2020 (20200416), thru April 30, 2020 (-20200430), in sequence of 1342,Posted (1342P). If there is no prefix or suffix, then the file is ready for the program or the end users to use. For example: ARPD20200301-20200331.xlsx - This file was created when post distribution journal from Accounts Receivable to General Ledger, and then wait for GL to update. ARPD20200301-20200331 stands for Accounts Receivable (AR), Posting in Detail (PD), data from March 1, 2020 (20200301) thru March 31, 2020 (-20200331). A file with a prefix “ZZ-” generally means a user exported the file from the program. You may open it and use it. If this is password protected, it is for your supervisor or administrative staffs to use. The password can be reset by end users. The default password is “Admin” or “Admin000”. (4) File Management Warning and Advice Warning: Any attempt to manipulate a non-end-user file may damage the program. You should pay extra attention to maintain and take care of the files. Advice: Create a habit of backing up all files in the folder. Make a daily backup and store them in different locations if necessary. Appendix III. – Program Requirements and Technical Reference The standard version of ExcelBook Accounting is designed for small businesses only. · Private Companies who have fewer than 50 employees · Gross annual revenue under USD $20 million · Total general ledger accounts fewer than 150 accounts · Total number of vendors less than 200 accounts · Total number of major repeated customers less than 300 accounts · Any employee may not have an annual compensation over USD $200K and may not be paid lower than USD $8 per hour. The trial version of ExcelBook Accounting is free for the users of: · Nonprofit organizations · Educational entities · Educators · Accounting students · Mom and Pop businesses with gross annual revenue under USD $5 million or fewer than 5 employees Hardware and Software requirements: · PC users (not for Mac) · Excel 2007 or higher; Excel 2007, 2010, and 2013 is recommended. Office 365 or Excel 2016 has a screen update issue and has not yet been resolved by Microsoft. · Minimum 8G RAM and 10G free hard disk. Clear sample data/make blank copies of the program: To clear the sample data: go to [Setup] Page, click on [Close Year-End] button, enter an eight (8) digit clearing code to erase all existing data (get the clearing code from ExcelBook.Org). |
Send mail to Support@ExcelBook.Org with questions or comments about this web site.
|